Saturday, June 25, 2011

School is Definitely Cool!

Hello again!  I am here with another couple layouts for you created with out School is Cool line.  One of them you might have seen last week on my blog during the 1st ever Scrappin' Sports & More Blog Hop.  In fact, you can still get in on the fun of that blog hop! You can win the entire School Is Cool line of paper and the cardstock stickers to go with it!  You only have until Midnight on June 27th, so hurry!  Just scroll down the blog to see all of the details… Don’t miss out on the fun!

Okay, so here you go....


Friday, June 24, 2011

A school year in review...

It's so fun to look back though the years and see how much our kids have changed...especially when they are little.  But this year, my 15 year old shocked me the most.  She went from short hair and glasses to long hair and contacts.  It's crazy how mature she has gotten in just one year of high school! 
I think she can quit growing any time now! :)

~Shannon

Products Used:
#1359 3rd/4th grade
#1362 Freshman Grade

Thursday, June 23, 2011

Gift Bag Tutorial!

Before we get to the tutorial, don't forget to play along in our Blog Hop!  You have until Monday, June 27th to play along and a winner will be posted here on the blog on the 28th!  See the hop and what you can win HERE!

On my blog for our blog hop, I created a gift bag and told you all to let me know in your comments if you wanted to see a tutorial.  You said you wanted to see it, so here it is!!  It looks like a lot of steps, but it's really easy- I promise!!

First of all, gather your materials.  You will need 2 pieces of patterned paper (or cardstock), a scoreboard/scoring tool, paper trimmer, scissors, adhesive, hole punch, eyelets/eyelet setter (optional), ribbon, tag or decoration for the front.

The first piece of paper should be at 12"X12".  You need to score it at the following measurements.

The 2nd piece of paper should be trimmed to 10"X12" and scored at the following measurements.
Now, fold all of your score lines as shown below.


 On the 12"X12" piece of paper, use scissors to remove the area of the paper between the 3" horizontal score line and the 2.5" score line as shown below.  Repeat on the other side using the 3" horizontal score line and the 9.5" score line.

 On the 10"X12" piece of paper, make one cut from the edge of the paper into the 1.5" score line along the 3" horizontal score line as shown below.  Repeat on the other side using the 3" horizontal score line and the 8.5" score line.

Now flip your paper so you are looking at the side that will face the outside of your bag.  Add a strong adhesive to the outer most flap (the 1" wide section) on both sides.  I used my ATG gun, but a sticky strip would work well, also.

 Stick down the 10"X12" paper on to the flap that you just put adhesive on.  The edge of the paper should run along the 1" score line of the 12"X12" paper.

 Now, fold the 12"X10" paper underneath and fold the 1.5" flap over onto the 1" section that has ahdesive on it.  Again, the edge of the paper should run along the 1" score line.

 Now, to form the bottom of the bag, add adhesive to the outer flaps of the bottom section as shown below.

 Fold the bottom flap over and ahere the sticky ends to the innner sides of the bag.

Now, add adhesive to the remaining bottom flap.

 Fold the flap over to close the bottom of your bag.

Now, the basic bag is made!  All you have left to do is decorate it!  And, you can do that any way you want!

Here's how I chose to decorate my bag...  I started with a 2"X11" strip of white cardstock and one of the red preschool paper.  I used my Fiskars Scallop Border Punch along the red and then adhered them together as shown.  You need to make TWO of these strips and score them at 1.5", 8.5" and 10".

 Now, adhere the strips to the top of your bag.  They should go all the way around and should overlap slightly.

 Next, punch holes for your handles and add eyelets (optional- you could use holes).  I put mine at 1" in and 1/2" down on either side.

To make the handles, I chose to use ribbon, but the only white ribbon I had was satin and too "floppy" to make good handles.  So, I cut two pieces of ribbon that were approximately 18" long and ahdered a 1/4"X9" strip of the red paper to the ribbon to make it stand a little straighter.

Now, feed the ribbon through the eyelets/holes and tie a know on the inside of the bag.  Trim off excess ribbon as shown.  Repeat on the other side of the bag to create two handles.

Finally, if you want to, you can add a tag or decoration of your choice.  I used my Nestibilities dies and a stamp to create mine. 

Here's the bag I just made next to the one I made for the blog hop!

Thanks so much for stopping by today!  Please let me know what you think of the tutorial and share your gift bag on our Facebook page so we can share some love!

~Nicole~

Wednesday, June 22, 2011

School Days

Since we kicked off this week with our first blog hop and a chance for you to win SSM's entire School is Cool line, I thought I'd make another mini book featuring my son's first and last days of school for each grade!

You can check out my teacher mini book on my blog - be sure to leave a comment for your chance to win SSM's School is Cool line!


Products used:
School is Cool Papers

Thanks for stoppin' by!
~Carolyn

Tuesday, June 21, 2011

Day 2 of the Blog Hop

Don’t forget our Blog Hop going on this week! You can win the entire School Is Cool line of paper and the cardstock stickers to go with it! You only have until Midnight on June 27th, so hurry! Just scroll down the blog to see all of the details… Don’t miss out on the fun!

I wanted to show you another way to use the School is Cool line.  Today I created a birthday card with some of the leftover scraps I had after creating my Blog Hop project.  This is a quick and easy way to save money on store bought cards and use your scraps at the same time.  This card is going to my baby, who is turning 11 today!


Scrappin' Sports Paper Used:
#1357 School is Cool First Grade (green)
#1358 School is Cool Second Grade (orange)
#1359 School is Cool Third (yellow) & Fourth (purple)

Thanks for stopping by the blog.  Also don't forget the DT call going on through June 27th.  Can't wait to see the submissions!

Monday, June 20, 2011

Scrappin' Sports & More Blog Hop!!

Welcome to Scrappin’ Sports & More’s first ever blog hop!


It’s the time of year when we are all looking forward to summer, but we want you to think about school for just a little longer! We would like to feature our fabulous new “School is Cool” line and we think you are going to LOVE it! Whether you are scrapping the first day of school, the last day of school, school pictures, or making something fun for teachers, this is the line for you! And, by doing a few quick things, you will be eligible to WIN the entire “School is Cool” line!!

There are THREE ways you can win!
1. Leave a comment on all of the blogs included in the hop (including this one!).
2. Become a follower of our blog. If you are already a follower, then that one’s already done!
3. “Like” our Facebook page and leave us a comment there telling us what you love about our new “School is Cool” line of paper!

You will be entered into the prize drawing once for each of the three possible ways to win. You will have until midnight on June 27th and a winner will be posted on our blog, and on our Facebook page on June 28th. Have fun!

Now on to the really FUN part! Check out each of the projects that our design team has put together for you. Just hop to each blog and don’t forget to leave some lovin’ so that you will be entered to win!

--->Scrappin’ Sports & More Blog <---

The winner will receive one of EACH of the 12 double sided papers from the School Is Cool collection AND both sets of cardstock stickers!!  And, let me tell you, these papers are F-U-N!! 

Here's a big ol' hint of what you can win!  To see larger photos of the entire collection, just click HERE!
  
 
Thanks so much for playing along! Good luck!

Friday, June 17, 2011

So Proud!

I am so proud of my daughter!  She graduated with honors a couple weeks ago with her BA in Education and is officially an English Teacher!  I still remember teaching her to read, and then to write, and everything that goes along with that.  Seems like yesterday!  She will head back to graduate school in the fall for her Master's Degree and I can hardly believe it! 

Here she is on her big day:


The School is Cool Paper line was perfect!  I combined the Graduation papers with the 5th/6th grade sheet for a fun combination! 

Don't forget about the Design Team Call in progress right now!  You can find all the information here!

Wednesday, June 15, 2011

Need a tissue?

With school coming to a close, I instantly start thinking about school supplies for next year so I can stock up for the summer.  Things that are always on the list...pencils, crayons...TISSUES!!  So why not create this cute tissue box cover?


Here's how...

Start with 2 sheets of 12x12 cardstock (I used white).  Cut the following dimensions:

2 - 9 1/2" x 5 1/8"
1-  6 9/16" square

Step 1:  Score the 2 pieces of 9 1/2" at 1/2" and 4 3/4" so you have a 1/2" section and 2- 4 1/2" sections.
Step 2:  Apply glue (I used double-sided tape) to the 1/2" section and glue it to the 4 1/2" section of your second piece of 9 1/2" x 5 1/8".  Repeat.  This will make a box.
Step 3:  Score your 6 9/16" square 1" on each side.

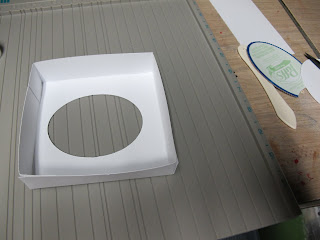
Step 4:  Using a cutting template (or tracing around the opening of the tissue box), cut an oval shape from the center of the 6 9/16" piece. 

Step 5:  Cut one side of the squares that were made when you scored the 9 1/16" piece.  You will need the cuts to be able to fold this piece into the lid. 
Step 6:  Using some adhesive (I used an adhesive square), fold the cut square under to form the lid.

Step 7: Once you have made the lid, place it INSIDE the box you have created and apply adhesive so that it stays. 
Step 8:  DECORATE!!

Your teacher will thank you!!  And don't stop there...get started on Christmas or birthday presents.  Who doesn't like a pretty tissue box?  I even made one for my office!!

~Shannon

Products Used:
#1355 Preschool
#1359 3rd/4th Grade